Step 8: Configuring Environment Variables
Using environment variables is a best practice for managing configuration settings, especially when working with different environments (development, staging, production). Environment variables help keep sensitive information like database credentials and API keys out of your codebase, making it easier to manage and share your application securely.
In this step, we’ll incorporate environment variables into our project and configure them for both the Docker containers and the Node.js application. We’ll also follow some general best practices for working with environment variables, such as separating concerns and using a dedicated file to load and export the variables.
Setting up Environment Variables
-
Install the
dotenvPackage: First, we need to install thedotenvpackage, which allows us to load environment variables from a.envfile:npm install dotenv -
Create a
.envFile: In the root of your project, create a new file called.envand add the following environment variables:NODE_ENV=development PORT=3000 # MongoDB MONGODB_HOST=localhost MONGODB_PORT=27019 MONGODB_DATABASE=mern-db # Redis REDIS_HOST=localhost REDIS_PORT=6381NODE_ENV: Specifies the current environment (development, staging, production).PORT: The port on which the Node.js server will run.MONGODB_HOST,MONGODB_PORT,MONGODB_DATABASE: Separate variables for MongoDB connection details.REDIS_HOST,REDIS_PORT: Separate variables for Redis connection details.
-
Create an
env.tsFile: In thesrcfolder, create a new file calledenv.tswith the following content:import dotenv from 'dotenv'; // Load environment variables from .env file dotenv.config(); // Export environment variables export const { NODE_ENV, PORT, MONGODB_HOST, MONGODB_PORT, MONGODB_DATABASE, REDIS_HOST, REDIS_PORT, } = process.env;This file loads the environment variables from the
.envfile and exports them for use in other parts of the application. -
Update
database.ts: In thedatabase.tsfile, replace the hardcoded MongoDB URI with the environment variables:import { MONGODB_HOST, MONGODB_PORT, MONGODB_DATABASE } from "./env"; import mongoose from "mongoose"; const CONNECTION_URI = `mongodb://${MONGODB_HOST}:${MONGODB_PORT}/${MONGODB_DATABASE}`; const connectDB = async () => { try { await mongoose.connect(CONNECTION_URI); console.log("Connected to MongoDB"); } catch (error) { console.error("Error connecting to MongoDB:", error); throw error; // Rethrow to handle it in the caller } }; export default connectDB; export { mongoose }; // Export the mongoose instance for use in other files -
Update
redis.ts: In theredis.tsfile, replace the hardcoded Redis URL with the environment variables:import { REDIS_HOST, REDIS_PORT } from "./env"; import { createClient } from "redis"; const CONNECTION_URL = `redis://${REDIS_HOST}:${REDIS_PORT}`; const client = createClient({ url: CONNECTION_URL, }); // Connect to Redis const connectRedis = async () => { try { await client.connect(); console.log("Connected to Redis"); } catch (error) { console.error("Error connecting to Redis:", error); throw error; // Rethrow to handle it in the caller } }; client.on("error", (err) => console.log("Redis Client Error", err)); export default connectRedis; export { client }; // Export the client instance for use in other files -
Update the Server Configuration: In the
server.tsfile, import theenv.tsfile to access the environment variables:+ import { PORT } from "./env"; // Other imports remain the same const app: Express = express(); - const port = 3000; + const port = PORT || 3000; // The rest of the server configuration remains the sameThis change ensures that the server listens on the port specified in the environment variables.
Configuring Docker Compose
Environment variables in Docker Compose provide a convenient way to manage configuration settings for your containers. When you define environment variables in a .env file in the same directory as your docker-compose.yml file, Docker Compose will automatically load them and make them available to you to define services and containers.
-
Update
docker-compose.yml: Replace the contents of thedocker-compose.ymlfile with the following:version: '3' services: mongodb: image: mongo ports: - ${MONGODB_PORT}:27017 volumes: - mongodb_data:/data/db environment: - MONGO_INITDB_DATABASE=${MONGODB_DATABASE} redis: image: redis ports: - ${REDIS_PORT}:6379 volumes: - redis_data:/data volumes: mongodb_data: redis_data:Here’s what we’ve changed:
- Used the
MONGODB_PORTandREDIS_PORTenvironment variables for port mapping in themongodbandredisservices. - Defined the
MONGO_INITDB_DATABASEenvironment variable for themongodbservice, which sets the initial database name.
- Used the
-
Test Run the Containers: In the root of your project, run the following command to start the containers:
docker-compose up -dOpen Docker Desktop to verify that the MongoDB and Redis containers are running at the specified ports.
Test the Application
Once the Docker containers are running, seed the database by executing the following command:
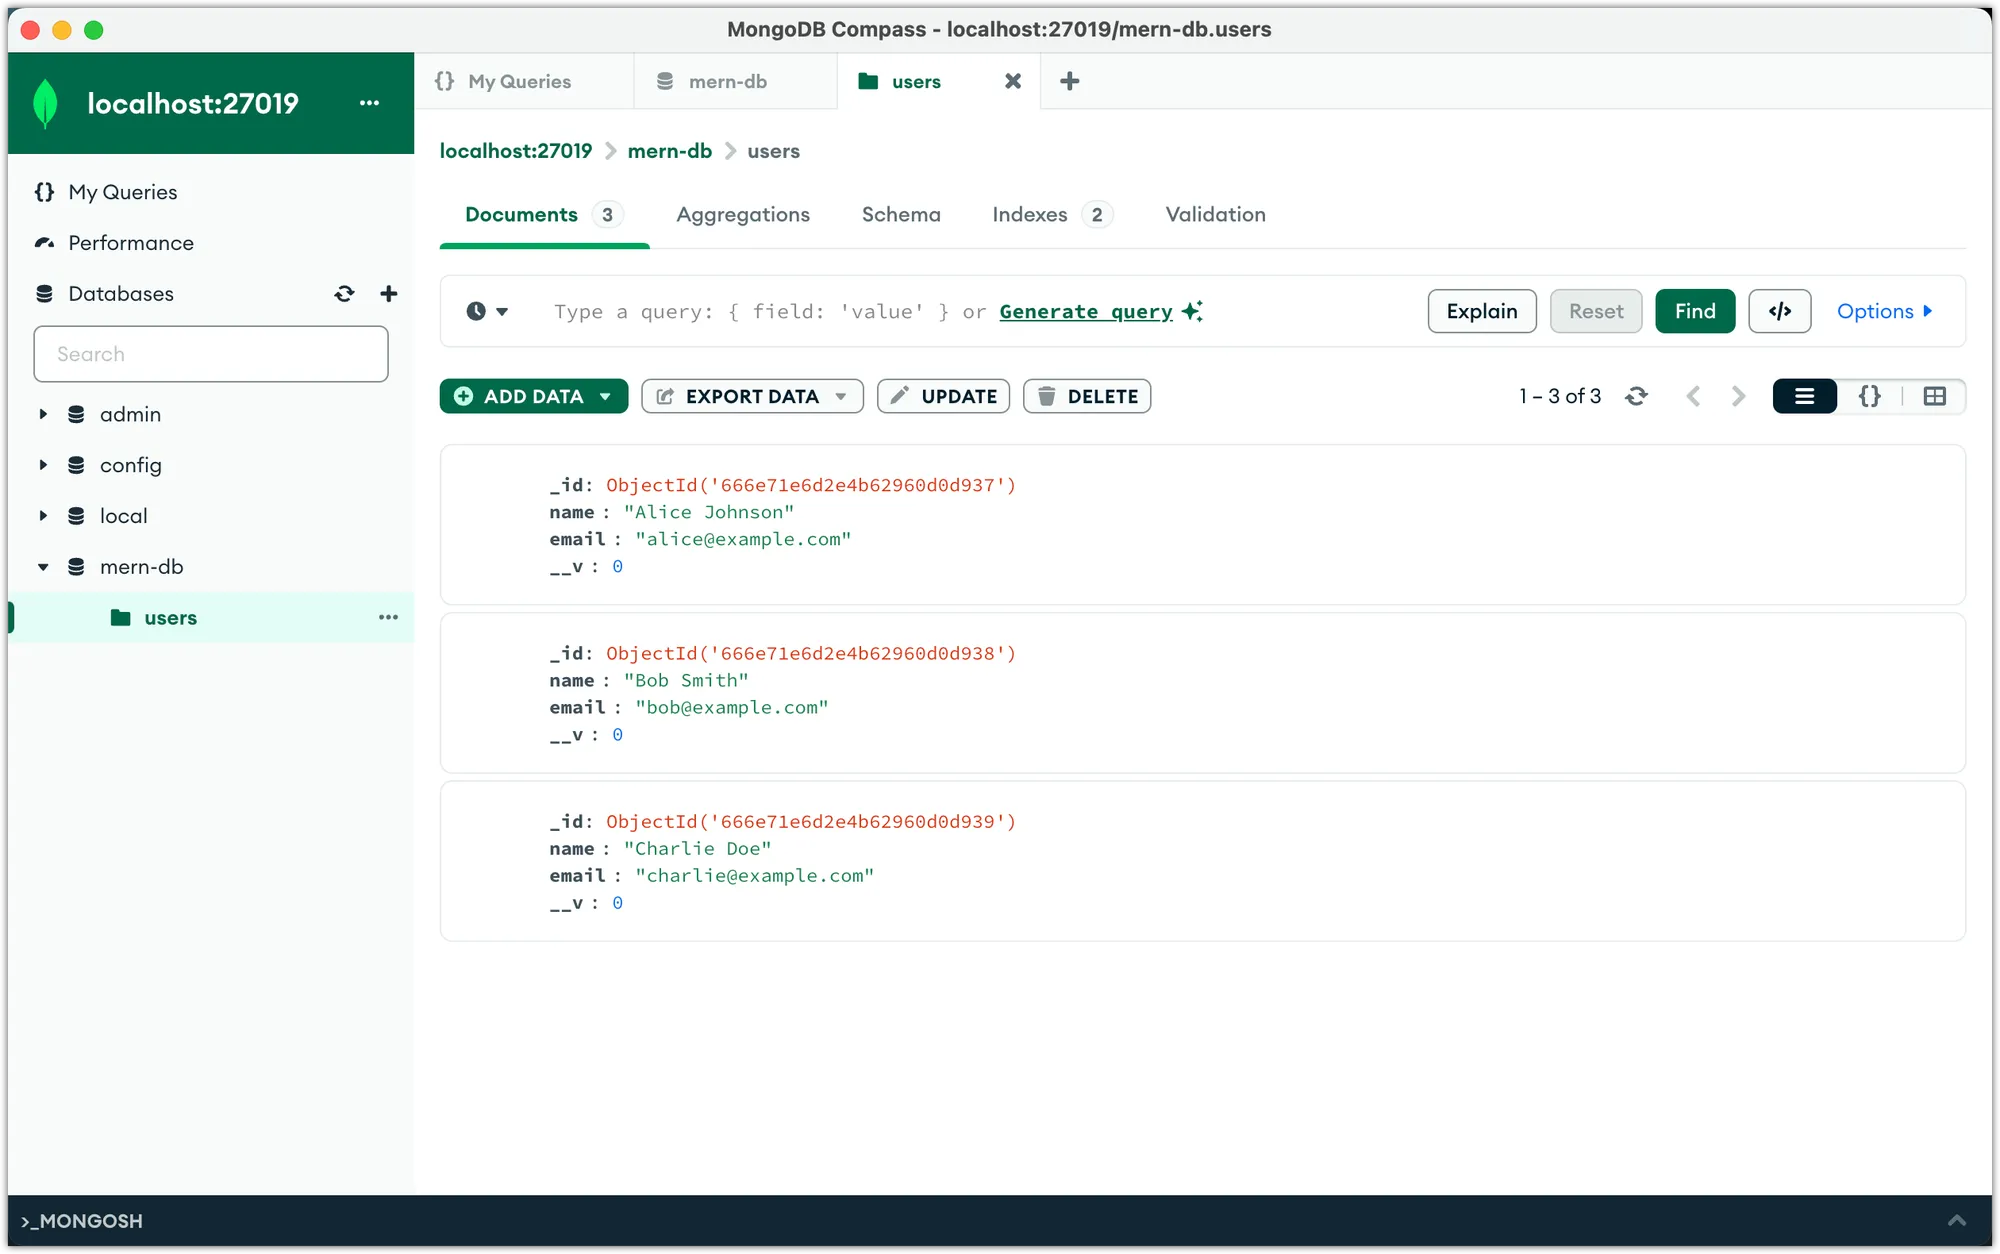
npm run seedThis command creates sample users in the new MongoDB instance, mapped to the local machine’s port 27019 (or any other port specified in the .env file as MONGODB_PORT). You can confirm this by connecting to the MongoDB instance via MongoDB Compass and inspecting the mern-db database.
Upon starting the server with the npm run start command, the terminal should display the following message:
Connected to MongoDB
Connected to Redis
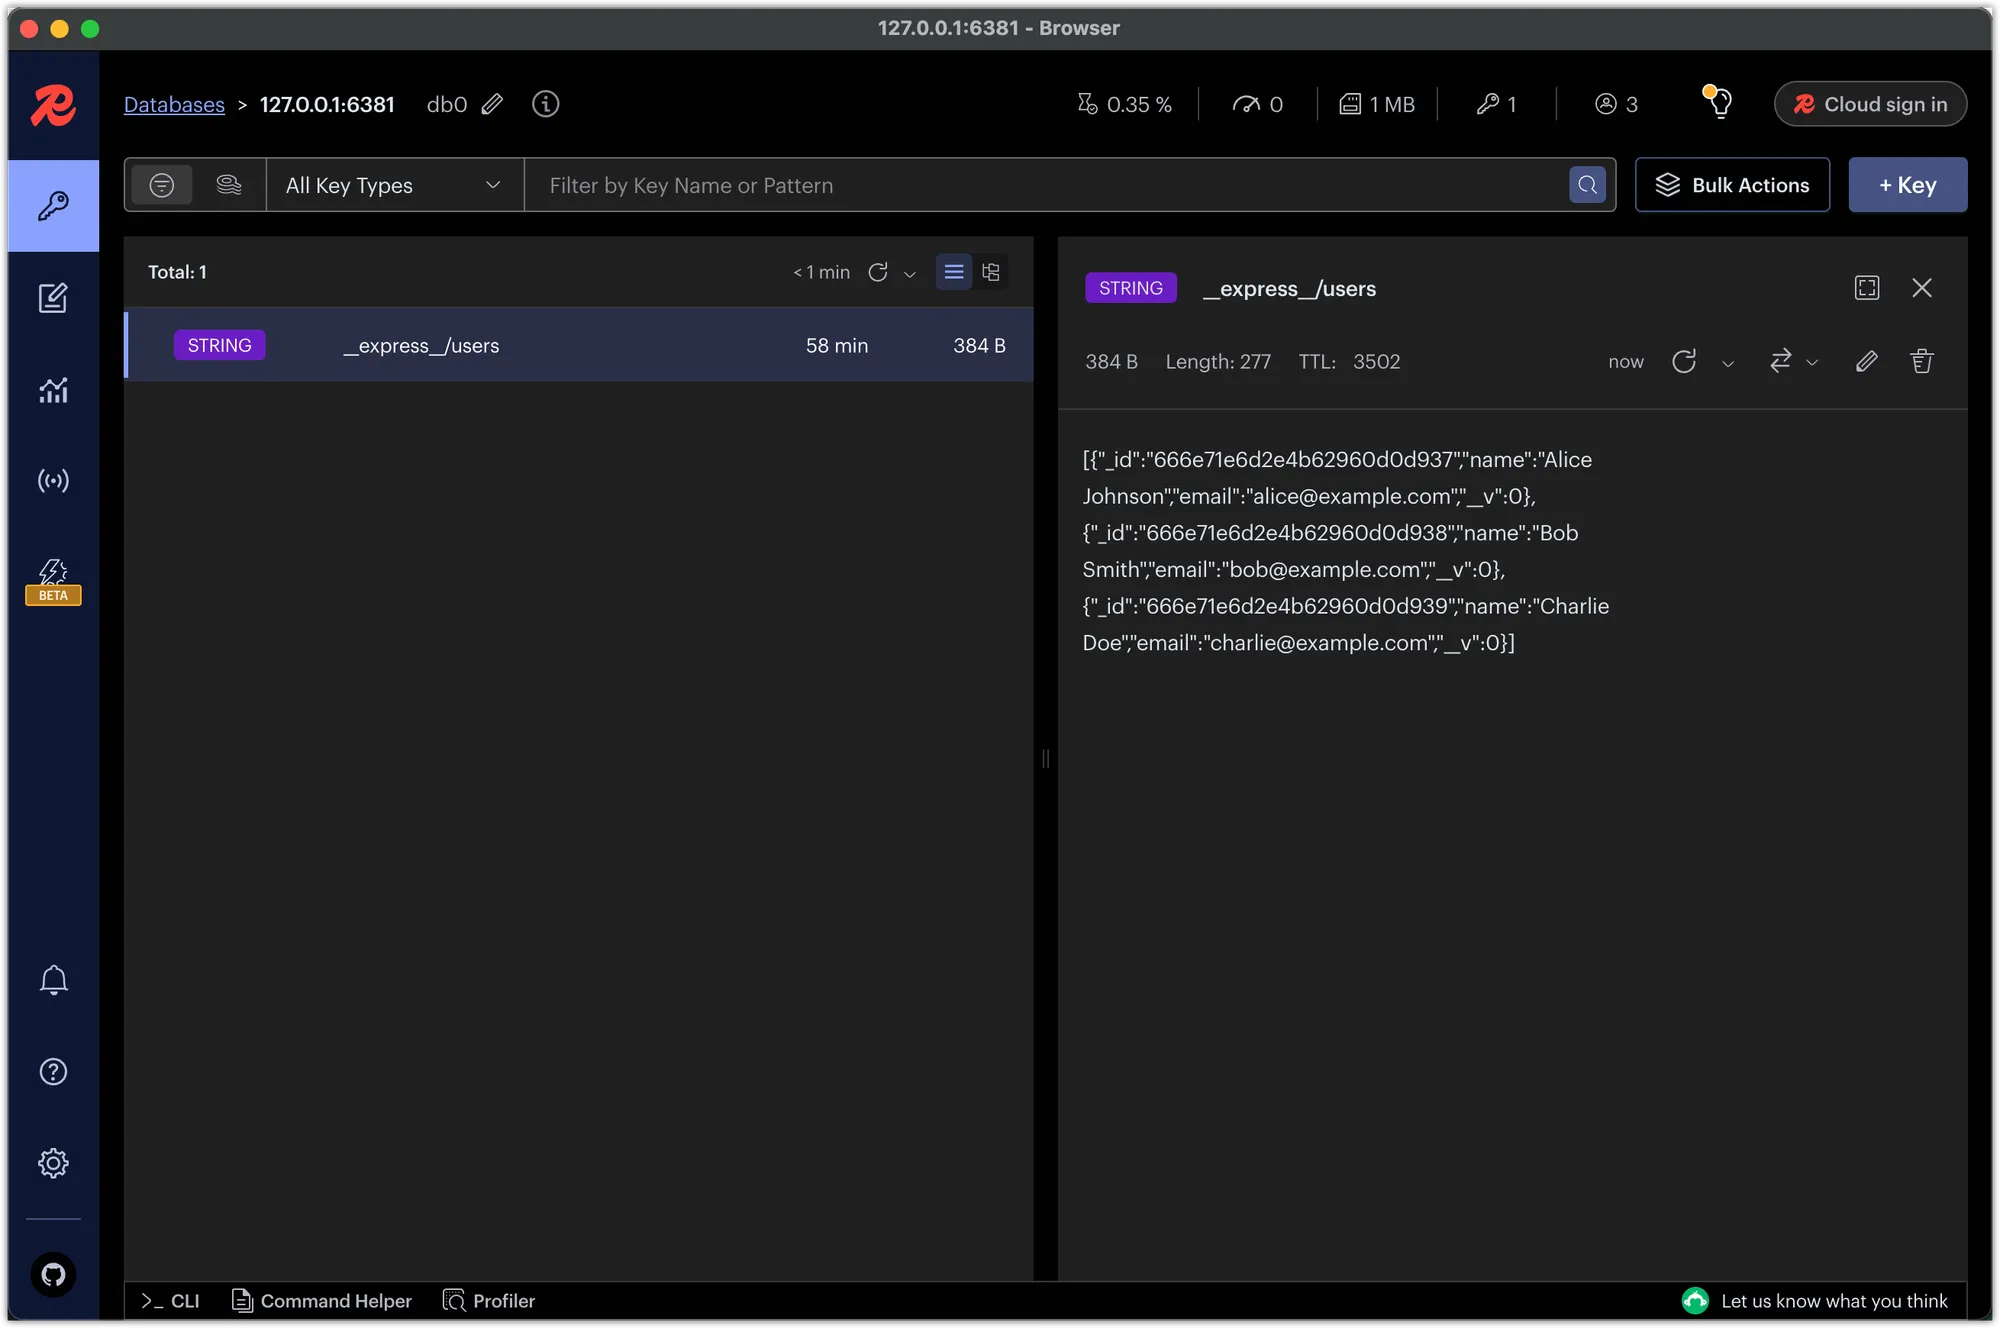
Server is running on port 3000Next, navigate to http://localhost:3000/users in your browser or through Postman. This action should display the users and cache them in the new Redis instance running as a Docker container. You can verify this by connecting to and inspecting this Redis instance via the Redis Insight app.
With these changes, your application (and Docker Compose) will use the environment variables defined in the .env file. This approach makes it easier to manage configuration settings across different environments and ensures that sensitive information (like database credentials) is not hardcoded in the codebase.
In the next step, we’ll explore how to run the Express server in a Docker container. This allows you to develop and debug your application without installing its dependencies locally.